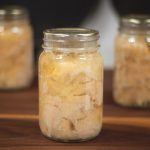
Pressure Canning Chicken - Raw Pack Method with Broth
Ingredients
- chicken boneless, breasts or thighs
- Better Than Bouillon chicken flavor, or chicken broth
- salt optional
- onion powder optional
- garlic powder optional
Instructions
- Prepare your canning equipment and canner. Wash and inspect all your canning jars and lids. Add the appropriate water to your canner (according to manufacturer's instructions.)
- Cut all the chicken into large cubes, try to have consistent sizes - as much as possible. Remove any excess fat.
- Prepare your "better than bouillon" according to package directions. You will need about 1 cup of liquid per pint. Heat it up in a large pot, Bring it to a simmer, and then turn off the heat.
- Place the chicken in your jars, pack in, but not too tightly. Fill to 1 1/4 inch of headspace.
- OPTIONAL: If you wish, add 1/4 teaspoon of onion powder and garlic powder to each pint (1/2 each per quart). You can also add 1 teaspoon of salt per quart, or 1/2 teaspoon of salt per pint.
- Fill the jars with broth/bouillon up to the head space. Use a bubble wand to remove bubbles between the chicken pieces. Add broth to maintain the headspace.
- Dip a damp cloth into white vinegar, and clean the rim of your jars very well. This is especially important when canning meats, because the grease from the meat can hinder the jars from sealing.
- Position a lid and ring on your jar, and tighten finger-tight. Place it in your pressure canner. Repeat the process with all the meat.
- When your meat is all jarred up, close and seal your pressure canner. Bring the heat up until you have a steady stream of steam coming from the vent pipe. Allow the steam to vent for 10 minutes.
- After 10 minutes, place your weight or regulator on the pipe and bring your canner up to the appropriate pressure. Process your jars for the time required. Pints: 75 minutes, Quarts: 90 minutes. Pressure required is 10 lb for a weighted gauge canner, and 11 lb for a dial gauge pressure canner. See the chart in the post for adjustments if you live over 1,000 feet elevation.
- After your canner has done processing, turn off the heat and allow the pressure to come back down to zero naturally. Do not manually vent the pressure.
- Once the pressure is down to zero, wait another minute, then remove the weight/regulator. Wait another minute.
- Carefully remove the lid from the canner, and allow the jars to sit there another minute.
- Use your jar lifter to transfer the jars to a lined surface in a draft-free location. Let the jars cool 12-24 hours or until they are completely cool. I usually let them go until the next day.
- Remove the rings, test the lids to make sure they are sealed. If you have a jar that didn’t seal, stick it in your fridge to use right away.
- Wash your jars with warm, soapy water. Label the jars, and put them in your pantry for future meals.
See This Recipe:
https://cosmopolitancornbread.com/how-to-pressure-can-chicken/Equipment Used
- Canning Tools funnel, ladle, etc.
- white vinegar
- small dish
- canning jars with lids quart or pint
- cutting board
