
How to Build an A-Frame Chicken Coop a.k.a The Movable “Chicken Sled” – Get FREE Plans for this easy to build coop below!

I have made many chicken coops over the years, and we are all in agreement that this is the best one by far.
Why I Love this Coop Design
It’s Movable
First of all, I am calling this design, “The Chicken Sled.” It’s made to be a movable coop that slides on skids, just like a sled.
It does have a little weight to it, so you may need to pull it with a vehicle (tractor, truck, ATV, etc.) but Mr. Smith and I can move it as a 2 man job by simply pulling it with a strap.
This Chicken Coop is Self-Cleaning
This coop has a floor made of 1 inch square hardware cloth. That allows all of the chicken droppings to simply fall out to the ground.
To clean it…just move the coop! You’ll leave all the chicken manure behind.
So that means there’s no straw or wood shavings needed, and will save you money in the long run.
I have had many people asking me about how I made the “A Frame Chicken Sled.” In this article, I am sharing the basic plans for the frame, and then I explain how I finished it out.
Once you have built your frame, you can roof and finish it any way you like. You will see some things to make note of in the instructions.
Now before you get started with these plans, please read through them completely.
Generally when I am building something, I have the plans in my head and just build it. This time I was very meticulous, and took very detailed notes so that I could share the plans with all of you.
DISCLAIMER: Blueprints are not my specialty, I am not a professional carpenter, engineer, etc. I will do my best to make these as clear as possible.
Shopping List:
- 22 – 2×4″x8′ boards (studs)
- 2 – 2×8″x10′ – pressure treated boards
- 2 – 2×8″x6′ – pressure treated boards
- 1 – 1×6″x6′ – pressure treated board
- 3 – 1×3″x8′ boards for trimming doors
- 3/4″ poultry net staples
- 3″ exterior screws, I prefer the screws that use the hex bits (not Phillips head.) Much less risk of stripping.
- 1 inch hardware cloth, 2 rolls
- 2 – 1.75-in W x 3.98-in L x 5/16-in Dia. Stainless Steel U-Bolt
Cut List:
- 6 – 2×4 @ 64″ (top end cut at 60 degrees off square, bottom end cut at 30 degrees off square) – these are your verticals for the wall
- 8 – 2×4 @ 92″ – these are your horizontals for the wall
- 1 – 2×4 @ 64″ (both ends cut at 30 degrees off square) – this is the base board for one end
- 1 – 2×4 @ 32″ (both ends cut at 30 degrees off square) – this is the window bottom for one end
- 4 – 2×4 @ 46.25″ (both ends cut at 30 degrees off square) – these are your perches
- FOR THE BASE
- 2 – 2×8 @10 foot pressure treated – 45 degree corner cut (see diagram below)
- 2 – 2×8 @ 64″ pressure treated
- 1 – 1×8 @ 64 ” pressure treated decking board
- 3 – 2×4 @ 64″
- 8 – 2×4 @ approximately 21 3/4 ” – do not cut these ahead of time – see the notes in the instructions
Tools Used:
- Drills (I used both a regular drill and an impact drill)
- Hammer
- Multi-tool
- Miter Saw
- Framing Wizard
General Instructions:
Before you get started, know that the top angle of the rafters wood is a sharp 60 degrees off of square. That means that the angle of wood itself is only 30 degrees.
Cutting that angle is going to be a pain, unless your miter saw can cut such sharp angles. What you will most likely need to do, is mark the angle with your square, then cut it with a circular saw.
All of the boards are attached with the exterior screws, and I always try to put 2 screws in at each connection point.
Once you have your rafters cut, then you can simply attach the side support boards with the screws, creating the walls.
I find that laying this out on a flat surface makes it a breeze. My carport is really my work shop.
One vertical is placed at each end, and one in the center.
The cross boards are spaced evenly, right at 21 1/3 inches.

NOTE: I made the length of this structure 92 inches because I was going to roof it with corrugated roofing panels. Those panels require an overlap.
If you are going to sheath it in plywood and cover with shingles, you can make this the full 96 inches (8 feet) long.
If you wish to do that, you will need to adjust the length of all the parts from 7’8″ {92″} to 8 feet.)

Attach the two sections together, matching the sharper angles at the top.
At one end, attach the 64 inch board at the bottom. This will be attached on the inside of the verticals.


Next, attach the 4 – 46.25″ 2x4s as perches. These are attached as you see in the diagram below, on the end that has the 64″ bottom board.

The first is placed 8 inches from the end, and the rest at 16 inch intervals. This gives the chickens plenty of room in between them, without crowding. One end is left without perches, because that is where they will jump up to roost.
Attach the 32 inch 2×4 on the same end as the perches. Unlike the bottom board, this is attached flush with the verticals. This will be the bottom of a window for ventilation. (I inserted a pre-made vent, as shown later.)
Here we moved the A-frame out of the way so we could start on the base. We temporarily attached a piece of wood at the bottom and center of one end for stability while we moved it. This is why you are seeing 90 degree angles on those boards.
The end closest to the camera is the end we will build a large door for egg/nest access later.

To Build the Base of the A-Frame Chicken Coop
Cut a 45 degree corner off of each end of the 10 foot 2x8s. These are your skids.
Attach the pressure treated 64″ 2x8s to the skid, creating a large box. Place one at one end, close to the cut angle.
Place the other at 7’8″ – this (front) end will have more “skid” overhang. This is necessary.
Attach the pressure treated 64″ 1×8 at an angle on the forward end. This is a “skid plate” that will lay vegetation over as you slide the coop. Simply align it with the edge of the skid.
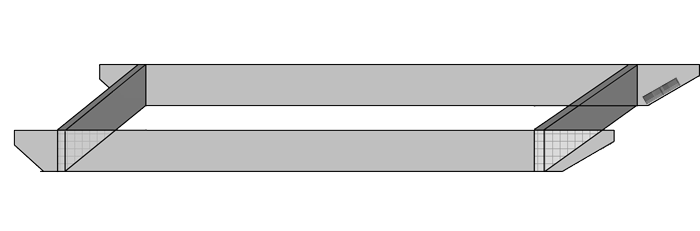

Attach the U-bolts above the “skid plate” with the U on the inside. You will need to drill the holes for these.

Next we’re going to frame the supports for the floor.
Attach the 64″ 2x4s, evenly spaced between the ends of the frame (Noted as blue in the diagram below.) They will be lined up with the top edge of the frame, so that the bottom of the board is above the ground.
Once they are attached, you will measure and cut 8 pieces of 2×4 to serve as connections between them. These will be approximately 21 3/4 inches, however I don’t pre-cut these, simply because of variations and imperfections in the wood.
I measure each space and cut a board to fit them. (Noted as green in the diagram below.) The boards should be staggered so that you can easily attach them with screws in the ends.


Now that the frame of the base is completed, you will cover the floor with the 1 inch hardware cloth. Attach the metal mesh across the width of the frame using the poultry net staples. These are “U” shaped nails.
I find them easiest to attach by holding them with my multi-tool while I hammer them in.
You want the raw (cut) edges of the hardware cloth to completely cover, or slightly wrap over the top of the frame. This will prevent your chickens from cutting their feet on sharp metal.

Overlap the mesh slightly on the joists.

The bottom portion is now completed.
Place the A-frame on top of the base and attach with screws. At this point the frame of your coop is complete, and you can finish it any way you like. Below I have diagrams showing how I completed mine.

This end of the coop is the end with the perches. I purchased a pre-made louvered vent from the hardware store and framed it in with pieces of 2×4. This vent allows airflow, but doesn’t let rain come in where the chickens are sleeping.
Then I framed a chicken door below that vent. These were done with scraps of 2×4 left from the project.
Once the frames were competed, I cut pieces of 3/4″ plywood to close the openings and finish off the ends.
I then built a door from the plywood, (about 16×18 inches) framed it with 1×3″ pieces and attached it with hinges. I made a door latch (swivel wood) and built a little ramp.
This end was finished.

TIP: When you finish out the ends of your structure, any board that is placed vertically to meet the roof/sides – must be cut at the very sharp 60 degrees off square angle.
Any board that connects horizontally to the roof/sides will be cut at the milder 30 degrees off square angle.

On the other end, I cut a horizontal 2×4 to sit flush with the end, dividing the end in half. The top portion, I covered with 1/2 inch hardware cloth, attaching it with the poultry net staples. I covered the bottom edge of the hardware cloth with a piece of 2×3 that was a scrap from another project.

The bottom half is a large door.
The door is big enough that I can climb inside the coop if necessary – you never know! This is also the end where the nesting boxes will be and how I will collect eggs. The hinges are at the bottom.
The door is 4 feet wide, and trimmed with 1x3s. Trim looks nice on these doors but it isn’t a decoration. It reinforces the doors and helps prevent the door from warping in the weather.
I attached a “leg” for support that is also hinged. It will support the door if I need to lay it open for any reason, and keep the hinges from getting stressed.
The latch is a wood swivel, just like on the other door. It is simply a piece of 2×4 that swivels on a screw. Turn it to latch or lock the door. It’s a frugal way of making a latch, basically for free from scraps.
Finishing the A-Frame Chicken Coop
To finish the A-Frame Chicken Coop, I covered the roof edges with some vinyl trim pieces found in the roofing section of my hardware store.
Then I covered the roof with Corrugated Asphalt Roofing Panels that I cut to length. There are 2 panels on each side, and they overlap by about 4 inches in the center.
The panels are attached with coordinating nails made for them. The top is covered with matching ridge caps of the same material. These roofing materials are the same ones I have used for my big coop as well as my rabbit tractors. It’s handy and easy to use.
The only thing that remained to do in these photos, was to simply paint the raw wood. Otherwise the coop was done. The nesting boxes we have are simple milk crates tucked inside the big door. They are easy to access, easy to clean, and inexpensive.

To move the coop, simply hook a chain or strap to the “U” bolts at the front, and pull. The coop will slide across the ground on the skids.
_
This A-frame structure could be used for all sorts of things, depending upon how you finish it out. If you make a structure from these plans, be sure to let me know. I would love to see photos!
Watch a tour of this coop and visual explanation of how it was built:
Would you like more information about keeping chickens? Check out my collection of articles on Keeping Chickens and Chicken Care.
Frequently Asked Questions about the A-Frame Chicken Coop
I have received a great number of questions about making this A-Frame Chicken Coop. Since these come up a lot, I thought I would update this post to address the most common.
How Much Does it Cost to Build?
The number one question I get, is how much would it cost to make this coop. Honestly, that is not an answer I could give you.
Even giving you a rundown of how much it cost me at the time I built it, would be pointless. Prices have changed dramatically in the past year due to “pandemic” issues, shortages, and a number of other factors.
I have provided the material list at the top of the instructions. To know how much it would cost you to build, take that list and check your local hardware store or lumber yard. Prices vary greatly according to where you live.
How Long Does it Take to Build the A-Frame Chicken Coop?
The amount of time it takes to build this coop, is dependent upon your skill level. I am not a master carpenter, but I am handy with tools.
My husband assisted me in making this, and the weather was atrociously hot, so we only worked in the mornings over the course of several days. Had the weather been nice, we could have easily completed it as a weekend project.
You Can Download a Printable PDF of these Plans:
This post updated with PDF file March 16th, 2025.
I would really like to try to build this but there is no plan download. I need to print the plans to bring to the shop and build it.
I have read your blog 4 times and can’t find a link to print. Very frustrating.
You are the first person to mention wanting a downloadable PDF of these plans. Most people have simply referred to this post for the instructions. But because you asked so politely, I have created and uploaded a PDF that can be downloaded and printed. ;)
So would this be good for let’s say a Wisconsin winter? Or should I maybe reinforce the insulation and ventilation to accommodate our extreme fluctuations in weather?
Hello,
We are looking to have our first flock of chickens this year, and I really like your chicken sled design!
I have what may be a question that brands me as a novice, but I will ask it anyway. I see roosts in there for the chickens at night, but no nesting boxes. Where do you have for them to lay at?
Thanks!
Great design! I wondered about this too. I know this thread is old now but I’m just seeing it now so would love to hear about that ……
I use milk crates and set them inside the large door. If you wanted to build some nesting boxes, you certainly could. I am pretty partial to removable nesting boxes though, because it makes them easier to clean. I have made wood boxes in the past with previous coops, but even with regular cleaning, over time they can get grimy and gross. A plastic milk crate or other plastic/metal removable box that can be taken out, sprayed down or scrubbed as needed and put back in clean is just much more easy and hygienic in my book :)
This coop’s attractive, well built and predator proof and above all it can hold a lot of chickens in a small space! Thank you very much!
What do you do in the winter with the hardware cloth? I live in NC and we can get down into the teens.
Hello! This looks like a great design. You may have mentioned it somewhere, but I am having trouble figuring out what the dimensions of the roof are…how big is each panel of the corrugated roofing? I am trying to price this all out. THANK YOU!!
Hi there! The sides of the roof will end up being 92 inches long and 64 inches tall. I chose to use the corrugated panel roofing that you see in the photos. It took 4 panels, 2 for each side, and they slightly overlap in the middle to keep out rain. Two of the top peak pieces, which I also overlapped, and a box of the matching nails that are made for it.
Could you tell us the total cost of the materials used in this please?
How many hours of labor?
Cost of tools if we have none please ? Skill level for someone who has never done any wood work?
I’m afraid I couldn’t possibly give you a price break-down, because the price of materials will vary greatly according to where you live and what locations you shop. Really, the same for the tools. I could possibly tell you the price of the brand of some of my tools, but I have had my tools for years and prices change, models sometimes change. You would really need to look at the post, determine what you need and see what they cost in your area.
As far as hours of labor, we did it when there was a heat wave going on, so we only worked a couple of hours at a time. If you had help, you could probably do it in a weekend. However, because of the precise angles needed, I would not consider this a beginner project. I have built many things over the years and have experience using tools, etc. It would take a first-timer a bit longer, I’m sure.
Can you just tell us what the materials cost you?
E.g. $100 – $200.
I just made a shopping cart on the Home Depot website and the total, including items not listed here like sealant, screws and hinges, comes out to about $525. (About $150 for the roofing alone.)
Have you had any bumble foot injuries on the hardware cloth? Any racoons reaching in to grab chicken toes?
Wondering the same thing.
Hmm, I could have sworn I replied to this when you first wrote the comment. No, I have not had any issues with any of my chickens getting bumble foot. The perches are only about 18 inches or so above the hardware cloth, so they aren’t jumping very far. As far as raccoons reaching in, there’s no where for them to do that. The sides of the coop are on the ground. Unless you have your coop on REALLY uneven ground, with gaps big enough, a raccoon can’t get under there. Even if they did, the perches are well above the floor of the coop.
about how many hens fit in here?
I have had 15 hens in there with room to spare.